From an empty profile to a running club operation: create the organization, structure groups, take in members, settle fees, organize sessions and attendance — and automate the routine work.
Version: July 2026For boards, admins & coachesWeb app · Android · iOS · Windows
Introduction & roles
In app2dat your club is represented by an organization profile (ORG). It owns and manages groups — from the central member group to training groups and events. The guiding principle for administration: members maintain their own data. The club only defines which information it needs — the tedious master-data upkeep disappears.
Roles within groups
Role
Code
Permissions
Admin
A
Full group access: members, settings, content, sessions, automation — including the “Administration” visibility.
Manager
M
Manages members, content and sessions like an admin (add, invite, change status, edit, remove) — without fields and groups of the “Administration” visibility and without the Automation Manager. E.g. for coaches.
Member
—
View content, join the chat, maintain their own data.
In addition there are administrators and managers at the profile level of the organization itself (see Profile administration) — so several board members can run the club together.
Admin or manager? When managing members — adding, inviting, changing status, editing member and profile data, removing, exporting — both are equal; a manager may open the group settings too. Reserved for the admin only: the “Administration” visibility level for groups, the group's Automation Manager, and — at the profile level — payment accounts, user and role management, and deleting profiles.
Convenient: If your personal profile is also an admin of the organization, you can edit directly in a group's member view — no need to switch to the management view.
Quick start: your club in 15 minutes
Create the organization profile — user menu → New organization; enter name, logo, category (chapter 3).
Define data fields — in the automatically created member group, set up the columns your club needs: contact data, fee, specifics (chapter 8).
Take in members — via invitation link/QR poster, import from a CSV list, or create them individually (chapter 7).
Structure groups — create training groups as event groups with sessions (chapters 5 and 6).
Start communicating — create chat topics, post the first announcement (chapter 11).
Optional: verify — for public groups, events and promotion (chapter 4).
Shortcut: The automation assistant (see chapter 16) can create the organization profile, groups and data fields for you on request — just describe your club to it.
Organization profile
Choose user menu → New organization.
Enter your club's name; optionally add an alias (see below) and provide a main-group template right away (template code + PIN from an association) — your member group then starts fully equipped with data fields, chats and automations.
In the Profile tab maintain the logo, description, categories (e.g. sport) and address — Check location validates the address for proximity search.
Together with the organization profile the member group is created automatically — the main group where all club members come together. It is the basis for data fields, fees and for copying members into further groups.
Alias: several profiles under the same club name
Next to the name you can store an alias in the Profile tab — it is optional and says what this particular profile stands for: a location, a department or a branch. When an alias is set, the profile appears everywhere as „Alias - Name“, for example on group and session tiles and in promotions. Without an alias only the name is shown.
Verification always checks the name only, never the alias. You can therefore set or change the alias at any time without losing an existing verification. And that is why an organization can create several profiles under the same company or club name and have each one verified against that name individually — the alias is what tells them apart. Invoices and payment receipts carry the verified name alone.
Categories: how you get found
The categories in the Profile tab determine which interests your club is found under — in the search, in the announcements and for promotions. They are organised in two levels: a main category and, below it, an optional subcategory, e.g. "Martial arts" → "Karate". At most 5 main categories per organization are allowed.
A main category and its subcategories find each other — so you are also found by people whose interest is set at a different level of detail than your categories:
Your category
Searcher's interest
Will you be found?
Martial arts
Martial arts → Karate
Yes — your broader term also matches the specific interest
Martial arts → Karate
Martial arts
Yes — those searching the broader term find you too
Martial arts → Karate
Martial arts → Kung fu
No — two different subcategories
If you select a main category, all of its subcategories are covered — individually ticked subcategories are removed when saving because they are already included. A karate club that also wants to be visible to people interested in Kung fu therefore picks the main category "Martial arts" instead of the subcategory "Karate".
The categories apply to the entire club. Individual groups and events have no categories of their own — they always inherit those of the organization profile. If you change the categories, this immediately affects already published groups, events and running promotions too; nothing needs to be published again. Exception: already published stories keep the categories they were given when created.
The organization profile's tabs
Tab
Content
Main groups
All standard groups of the club — including the member group.
Event groups
Two levels: folders first (e.g. "Trainings"), inside them the event groups.
Registrations
All registrations for the organization's groups and events.
Search
Find other organizations and events — e.g. courses of your association. Search categories next to the search field lets you look in other topics once, without changing your organization's categories.
Only verified organizations can offer public groups and events, book promotion and top up promotion credit. The verification is a paid annual step and confirms that a real club stands behind the profile. The app shows the valid price before the purchase — it depends on the payment route (slightly higher in the app store than by card/online):
Organization profile → Profile tab → Verify now.
Check the details: organization name, address, founding date and register number are pre-filled from the profile and read-only. If something is wrong, correct it in the profile first.
Select the responsible person — a verified personal profile aged 16+.
Attach an official document (e.g. register of associations or commercial register excerpt) — via file picker or straight as a photo; allowed are .pdf, .jpg, .jpeg and .png. Then submit.
The document is checked automatically; final approval is given by the app2dat team.
Status at a glance: You can always see the verification status (pending, verified, rejected, expired) in the profile. Verification is valid for one year. It can renew automatically — without re-uploading documents, switchable on or off at any time. If renewal is off and the verification has expired, you renew manually and choose whether the existing data is still valid (fee only) or should be updated and re-checked.
Creating & configuring groups
Group types
Type
Purpose
Special feature
Standard group
Communication & organization, e.g. "Coaches & helpers"
Chats, tasks, content, data fields
Event group
Training groups, courses, events
everything of a standard group plus sessions & attendance
Member group
the club's central main group
created automatically; basis for fees & import
Create a new group
Open the organization profile → Main groups tab (standard) or Event groups.
Tap , enter group image, name and description.
Set visibility, member type and PIN (see below), save.
The most important settings ()
Setting
Meaning
Visibility
Private (invitees only) · Internal · Members (all club members) · Public (anyone can join) · Administration (admins only — not visible to managers).
Member type
Persons — or organizations for cross-club events (see chapter 6).
Participant list
Who sees the member list: management only · member clubs manage their own participants · names only · no list. With “Participants (names only)”, members can message each other privately from the list and pin each other as contacts.
ID + PIN
The group ID (G…) and PIN are the key for joining via code or QR.
Max. registrations / age
Participant limit and age limits (min./max.) for joining.
Registration/unregistration requires approval
Joins and leaves must be confirmed by the management. Exception: member clubs that manage their own participants in a group register and unregister them directly — the approval only applies to people who register or unregister themselves. A club can also re-register an unregistered member directly; a regular manager must re-invite them here.
Non-verified profiles
Allow or exclude.
Templates: reuse your structure
With Share as template you turn a group into a template (PIN required). Other organizations — for instance your clubs as an association — simply enter template code + PIN when creating a new group: data fields, chat topics and automations are copied automatically. All clubs start with the same structure.
Shares for individual profiles
Via Add share you grant individual profiles access to a group — e.g. a guest coach from another club. Per share you control whether the person may edit and be contacted.
Group context menu
The ⋮ menu on each group bundles the administration: Edit, Invitation (link + QR), Promote, Copy, Move to, Archive/Unarchive, Delete and Automation Manager. Show or hide archived groups via the archive icon.
Event groups & folders
For sessions the hierarchy is folder → event group → session:
Event group folder — a purely organizational container, e.g. "Trainings", "Exams", "Events".
Event group — the actual group with participants and session management, e.g. "Beginners".
Session — the single appointment with date, location and attendance list.
Event groups tab → → create a folder (name, description, image).
Enter the folder and create the event groups inside.
Set up the sessions in each event group (chapter 10).
Cross-club events
Other clubs can register in your group and enter their own members as participants — ideal for courses, exams and competitions. Each club manages only its own participants; you as the organizer see the full list.
This takes two settings in the group dialog — the registration rules are not involved:
Set member type to "Persons" — the group's participants are people, not organisations.
Set participant list to "Org. members" — this is the actual switch: it releases participant management to clubs.
Common misconception: it does not depend on member type "organisations" and not on visibility. The typical case is an event group with visibility "Members" in which only clubs sign up their people — federation exams, for instance. Conversely, a public event group without "Org. members" releases no club participant management at all. This works in standard and event groups only, not in the member group.
A club gets this participant management once it is registered in the group itself — or is a member of your member group. It then sees the group in the Participants tab instead of the group data and registers and unregisters its people there directly.
In your admin member tab the list still shows the persons. Show organisations switches to the registered clubs; the same button then reads "Show persons" and switches back. You can also add clubs yourself: Add → "Add from the member group".
No rigid hierarchy: Any club can be an organizer — not just an umbrella association. A club can itself be a member of other organizations.
Managing members
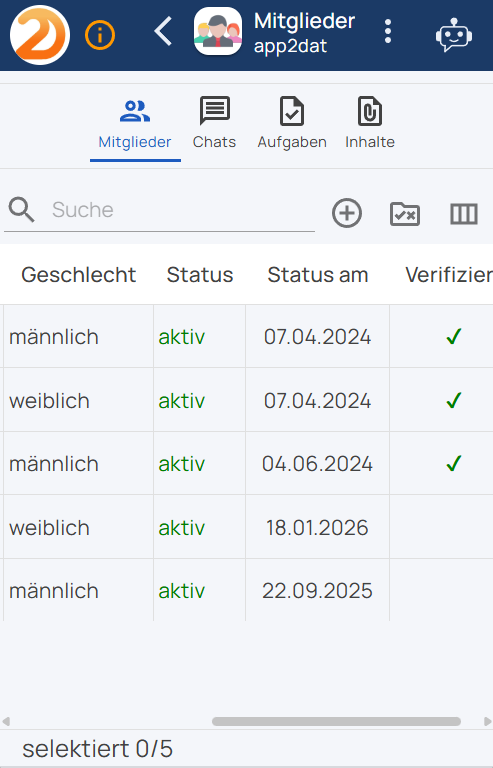
The management's Members tab shows the member table with all data fields as columns — sortable (multi-level too), searchable and with a selection mode for bulk actions.
Five ways to take in members
Invitation link & QR code: Group menu → Invitation generates a reusable registration link with QR — perfect for the notice board and website. Anyone following the link registers themselves with all required profile data.
From the member group: in a standard or event group you take profiles over from your organisation's main member group — Add → "Add from the member group". There is no free source-group picker; the member group always opens. Existing members cannot be selected — unregistered profiles can, which is how you take them back in.
Via profile code: Scan the member's profile QR or enter profile ID (P…) + PIN — Add takes them in directly, Invite sends an invitation to accept themselves.
CSV import: import whole member lists from a CSV file; a MAP file assigns the columns to the fields. The preview automatically detects existing members. Available in the member group only.
Create new: The club creates a managed profile itself — also for members without a smartphone. It can be handed over to the person later. Available in the member group only.
Marking as a bridge: to move the same people from one group into another, select them in the source group and choose Mark in the action menu. In the target group the add menu then additionally offers "Add marked" and "Invite marked" — both entries only appear while the mark list holds something.
Add or invite? "Add" makes the profile a member immediately. "Invite" only sends an invitation — the profile shows "Invited" and becomes a member once it accepts. The invite entries only appear if the group's visibility allows invitations. With every route app2dat also checks the age limits, the registration cap and any required verification — if something does not fit, the addition is rejected with a note.
The management's member table
CSV import step by step
The CSV import creates any number of managed profiles in one pass — available only in the member group (type M). The path: Members tab → Add → Import CSV data.
Load both files (file picker or drag & drop): the CSV file with the member data and the MAP file (.map) that defines the mapping.
Load data — a preview appears. Likely duplicates (same first and last name) are automatically left unchecked.
Check the desired rows, choose Import profiles and confirm with your user PIN.
The MAP file
Each line maps a target field to a CSV column — TargetField=ColumnHeader. The CSV separator is the semicolon (;) by default. An example of a .map file:
For each checked row the import creates a new managed profile and writes the mapped group data. Existing members (same first and last name) are skipped. The same import is also available as automation (a2d.import.membersFromCSVMap) for recurring runs — see chapter 16.
Member status
Every membership has a status — via the context menu Change status you control the lifecycle:
Status
Meaning
ACT
active — full member
INV
invited, waiting for acceptance
REQ / RACT
registration or reactivation requested — waiting for your approval
RNAC
unregistration requested
NAC
unregistered
BLK
blocked
DCI / DCR
invitation or registration declined
The status history (single selection only) documents every change with status, date and originator — and survives removal. So you can tell whether someone is genuinely new or was here before. Via a member's context menu you also reach profile data, copy email, private message, mark and removal from the group.
When changing status: all selected members must share the same starting status, otherwise app2dat stops with a note. A blocked profile cannot be activated directly — the dialog first offers "Set unregistered" only. And if the group settings require approval for unregistering, you may not simply reactivate an unregistered profile but have to invite it again.
A security prompt, not a PIN: changing status, removing, transferring and CSV import first show the affected profiles for review and then ask you to type a random two-digit number ("repeat number"). That is not a PIN — neither the group nor the profile PIN — just a safeguard against triggering something by accident.
Unregister, block or remove entirely?
Action
Effect
Way back
Unregister
stays listed as a member, status "Unregistered"
any time via "Change status" → "Activate"
Block
stays in the list, can no longer register itself
first "Set unregistered", then activate
Remove
the membership is deleted, the row disappears
only via Add or Invite
The group data survives all three cases. What a member has stored in your data fields is kept separately from the membership — if the profile comes back, its data is there again. Unregistered, blocked and declined members are hidden by default; Options → "Show inactive members" brings them back into the list.
Careful in the member group: removing a profile managed by the organisation that has no user account of its own deletes not just the membership but the entire profile including all data. Unregistering is almost always the right choice there. Conveniently, the other way round: if you unregister or block someone in the member group, app2dat asks whether the status should be applied in all other groups of the organisation as well. In a single standard or event group this question deliberately does not appear.
All memberships of one person at a glance — including register/unregister, block and the bulk actions "Unregister all" and "Block all" — are found with single selection under Edit members → Profile management → "Group memberships".
Exporting
CSV export — freely choose profile and group fields; the order in which you tick the boxes is the order of the columns. The separator is the semicolon and the file is UTF-8 with BOM (Excel shows umlauts correctly straight away). Document fields cannot be selected. For event groups the attendance block is added (as a count or per session) — optionally the responsibilities instead. Here all selected rows end up in the file, including unregistered ones.
QR codes & profile images — as labels in a grid with configurable dimensions (factory preset Avery A4: 70 × 42.3 mm, 3 columns × 7 rows = 21 labels; presets per group, QR and images kept separate), e.g. for membership cards. Only active members make it onto the sheet — anyone unregistered, blocked or merely invited is silently skipped. In the image export a member without a profile picture leaves an empty label.
Data protection: a CSV holding addresses and dates of birth is unprotected data — pass it only where it belongs, and do not leave it sitting in the downloads folder.
Data fields (group data)
Data fields are the columns of the member list and at the same time the form members fill in themselves. Configuration: Members tab → Available data fields.
certificate, consent form — uploaded by the member
Members
link to another group (via group ID + PIN)
Permissions per field
Permission
The member …
— (do not see)
does not see the field; it stays with the management — admin and manager work with it.
See (MR)
sees the value but cannot change it — e.g. grading.
Edit (MW)
fills in the field themselves — e.g. phone number. This is the core of self-service.
Use the field description: Members see a field's optional description as an info icon — explain there what to enter. It saves questions.
Bundling fields: data groups
The data group field in the field editor bundles related fields under a shared name — typically "Exam level 1" with date, location and examiner, next to "Exam level 2" with the same three fields. You can type freely; data groups already in use are offered as suggestions. In the columns dialog you recognise them by the name in square brackets, e.g. [Exam level 1] Examiner.
How a data group appears in the member table is controlled via Options → section "Data areas":
Default (both boxes off): combined — all fields of a data group share one column and are stacked inside it (the first three are shown).
split — every field gets its own column, with the data group name as a second header row.
editable — only selectable together with "split": values can then be changed directly in the table cell.
How to unlock inline editing — it takes both boxes in this order: "split" first, then "editable" (greyed out before). After that you tap a cell and type straight into it; the Enter key commits the value and jumps to the same column of the next row — handy for filling a column top to bottom. While "editable" is on, clicking a row no longer selects members and the "Edit members" button disappears — so switch it off again before running actions. Only your own group data fields are editable; profile and address fields belong to the member and stay read-only.
Entering values — for many members at once
The route: tab Members → select rows → Edit members → Edit member data.
For one member the dialog is called "Member data", shows picture, name and status on top, comes pre-filled with the existing values and saves every change immediately.
For several it is called "Overwrite member data" and starts empty — there is no common starting value. Only fields you actually fill in are written, using the same value for all selected members; every other field stays untouched per member. That way you set the field "Group" to "Advanced" for 30 members in one go. Nothing is written until Done; Close discards everything. A field filled in by mistake is taken back out via Remove edit.
The same dialog holds — for management only — the responsibility filter checkbox that decides who may be assigned to sessions (see chapter 10).
Member data is not profile data:group data belongs to your group — you create the fields yourself and the values apply here only; the same person can hold entirely different values in another group. Profile data (first name, last name, date of birth, address, contact) belongs to the person and is read-only in the member table. One exception: for a profile managed by your club in the member group the menu item reads "Edit profile data" — otherwise "Show profile data".
Fees & payments
Set up a fee
Create a data field of type Payment in the group (chapter 8).
Set the amount and currency.
Choose the interval: one-time or recurring (monthly, every 2/3/6/12 months) — plus the due date.
Recurring fees are checked on the server daily: for every due period a new payment request is created for the member automatically.
Individual fees per member
You can adjust the amount of an open payment request per member (e.g. a discount or family rate). The rule is: each follow-up request takes the amount of the previous one — an individually set fee therefore applies permanently until you change it again. A later change to the payment field itself only affects members who do not have a request for this field yet; existing members keep their previous amount.
If the member pays via Stripe subscription, a changed amount is transferred to the subscription automatically and takes effect with the next charge — without any immediate charge or credit. The edit dialog points this out beforehand; if the transfer to the payment service fails, the change is not saved and the reason is shown.
Bank transfer — bank name and IBAN; members see the details in the payment dialog.
Stripe — two ways: connect an existing Stripe account (you sign in to Stripe in the browser, the account stays yours) or have a new one created (the country comes from the club address and cannot be changed afterwards); members pay once or as a subscription for recurring fees — directly to the club's Stripe account. Payment always opens the Stripe payment page in the external browser (card payment and more, no customer account with the payment service needed). Optionally, Stripe creates an invoice automatically for one-time online payments; with a subscription, an invoice is created for every charge anyway. How the invoice looks (logo, company and tax details, number range) and whether Stripe emails it to the payer is defined in your own Stripe account. Stripe charges according to its own price list: the subscription fee for subscriptions (regardless of the invoicing option) and the invoicing fee for invoices on one-time payments — never both for the same payment.
Booking incoming payments
Online payments book themselves. If a member pays cash or by bank transfer, you mark the payment field in the member table as paid — the status turns green and the transaction is credited to both sides. Every payment appears in the profile's transaction overview (filterable by period and text).
Invoices & VAT: For services the club purchases directly from app2dat (verification, promotion credit), the platform creates tax-compliant PDF invoices with correct EU VAT. For membership fees app2dat is only the technical processor — not the seller.
Sessions & attendance
Creating sessions
Event group → Sessions tab → .
One-time session (multi-day possible) or recurring session — the series repeats weekly on the weekday of the start date until the end date.
Set the time from/to and the location — saved locations are reused across the group (the address is validated).
Save. There are deliberately no further fields — a session is just date, time and place. You assign responsible persons (e.g. coaches) afterwards per session directly in the calendar (see below).
Assigning responsible persons — in two steps
Responsibility is granted per session, on the card in the weekly calendar below — not on the session tiles above it. Their ⋮ menu only knows Edit, Copy, Delete and Promotion.
Decide once who may be responsible at all: tab Members → select row(s) → Edit members → Edit member data → tick "Responsibility filter". In the table this shows up as the column "Resp. filter".
Assign per session: in the Sessions tab tap the session card in the calendar → Responsibility → tick the person. Every tick is saved immediately; their initials then appear in green on the card.
Without step 1 the selection list stays empty: only members with the responsibility filter set appear in a session's responsibility list. The mark applies per group — someone supervising several event groups needs it in each of them. Only admins and managers may assign; members see under the same menu item only who is assigned, including contact details.
The responsibility filter is more than a session marker: whoever carries it may run the attendance lists of their sessions, see members' contact details and manage content such as topics, documents and tasks — without being an admin or manager. They can also run automation scripts flagged "also executable by responsible persons".
Only here do you get the overview: the calendar in the sessions administration shows all sessions of the club — not just this event group's — and on every card the initials of all assigned people. From here you can therefore assign sessions of other groups too, without opening them one by one. The filter Current group only hides everything else when needed. In the member views (start page, Sessions tab) you only see your own sessions and own initials — hardly usable for assigning.
Only upcoming sessions are visible: as long as no start date is set in the From date field at the top right, the session list above the calendar only shows sessions that have not expired yet. Below the list you see how many expired sessions there are and which period they cover — a click on that line brings them all back. Alternatively, enter an earlier date in the From field yourself.
Recording attendance
Checklist: session card in the calendar → Attendance — all members at a glance. Every tick is saved immediately, there is no OK button; without a connection the change goes into the queue and out later automatically. A "checked in" counter runs along the bottom, and the "Reason" column shows what a member noted when unregistering themselves.
QR scan at the entrance: activate the QR scanner in the same dialog and scan the arriving members' profile QR codes — every attendance is documented in seconds. A second scan never checks anyone out by accident. Someone not yet in the group is taken from the member group automatically; if they are not there either, you add them via Add straight from the attendance list.
Self-service: members sign up or off themselves, with an optional comment — only until the session starts.
The attendance list has no write lock. Admins, managers and the assigned responsible persons can fill it in at any time, even days after the session. The only thing locked after the start time is a participant's own response via "Register/Unregister". Only for a cancelled session does the "Attendance" menu item disappear entirely.
Recorded attendance flows into the CSV export — as a count or broken down session by session. The same export also evaluates the responsibilities: which coach took which session, with a total per person — a clean basis for payroll. Both exist in event groups only, since only they have sessions.
Cancelling or hiding a session
Via the menu item Session status on the session card you cancel a session with a reason — members see the reason and are notified; recorded attendance is cleared. Flip the same switch back to make the session happen again. Past sessions can no longer be changed.
In a series, a single occurrence can also be hidden (e.g. during holidays) — it then disappears from the calendar and comes back via the card menu.
Do not confuse: "Session status" concerns the session; "Change status" in the Members tab concerns a person's membership.
Communication
Creating chat topics
In the Chats tab you create topics via — e.g. "General", "Announcements", "Questions". Per topic you control whether comments are allowed and which emoji reactions are available; topics are visible to all members or selectively to chosen ones.
Announcements with reach
A chat topic with comments switched off becomes a pure info channel: only your organisation's contact persons write there, everyone else reads along and gets no input field at all. Ideal for "Announcements" or "Important information".
Who counts as a contact person is not set in the topic but in the organisation's profile: tab Profile → section "Contact persons" → Add contact person. Only a profile administrator sees that button — managers do not.
Reach beyond the chat does not come from the chat but from a post in the feed on the start page (see Stories & promotion) — there is no "mark message as announcement" function.
Surveys
Via the paperclip → Create survey: define the question, answer options (sortable, optionally with emoji) and behavior — Multiple selection, Anonymous for participants (only counts), Fully anonymous (including administration), Delay results until voting ends. You see the results per option with participants; the survey can be locked at any time.
Direct line
Private message to any member — right from the member list.
Copy email address — via a member's context menu (Copy email).
Push notifications go out automatically for messages, sessions and tasks. The bell column in the lists is merely a counter of unread messages — not an on/off switch.
Who sees a topic at all is decided by that topic's member list: the personal profile must be a member of the group and be included in the topic ("All members" or added individually). If either is missing, the topic does not show up for that person.
Tasks
In the Tasks tab you distribute the club work — from tournament setup to auditing the books:
Create via ⊕ with a subject (name); set priority, due date (date + time) and status afterwards directly in the table.
The effort (time spent) can be recorded per task.
Every task has its own task chat — questions and progress stay with the task.
Admins and managers can edit; members see the tasks and discuss in the chat.
Documents & content
In the Content tab you provide material to the group:
Folder structure — folders with documents and links (one level, no subfolders); rename or delete via the context menu (only when empty).
Documents — upload with title, description and optional version; open, edit, copy, delete via the context menu.
Links — external web addresses with preview.
File types & size — allowed are jpg, jpeg, png, pdf, txt, docx, xlsx, zip, 7z and rar, at most 20 MB per file. Links are inserted from the clipboard; there is deliberately no input field for the address.
Storage — the usage ("X of 5000 MB") is shown at the bottom. The quota applies per profile, not per group: all groups of your organisation share the same 5000 MB. If it is not enough, put the file in a cloud folder and store only the share link here.
Internal folders — if a folder name starts with an underscore (e.g. "_Templates"), only editors see it; for members it is invisible.
Members can view and download; admins and managers manage.
Stories & promotion
Stories: free reach
Posts from your organization profile appear in the "Announcements and posts" feed — with text (up to 5000 characters), photos, links, categories and location; up to five attachments counted together.
Who sees the post is not decided by membership but by the radius around the location and the categories: the post reaches everyone whose location and interests match. Creating one requires a verified organisation profile with a checked address and at least one category.
Reaching several languages: in the post dialog the Languages selection (below the location) narrows down who receives the post — select nothing and it reaches everyone. On top of that, a post can carry several language versions in one text: put a marker such as [lang:en] or [lang:de] in front of each version (buttons below the text field), and everyone reads their own language — those without a matching one get the English version.
Linking to one of your own groups in a post only works while that group is public and actively promoted (otherwise: "This group cannot be linked!"). Once the promotion ends, the post with the group card drops out of the feed — posts without a group link are unaffected.
Promotion: paid visibility
With promotion you make a group or a session visible in a targeted way — to people who are not members yet, by region and interests. Prerequisite: a verified organization profile.
Group or session context menu → Promote.
Choose the reach: a radius of 10–500 km around the venue, or nationwide.
Set the budget (daily or total budget, min. €5) and the runtime — the cost preview calculates everything.
Confirm. Billing is based on actual impressions (CPM) and clicks (CPC) — the current average rates are shown in the cost preview; never more than your budget.
You top up the required credit in the profile administration under the Balance tab: on Windows and in the browser by card/online, in the Android and iOS app through the store's in-app purchase. The top-up dialog shows which packages are available; larger packages occasionally come with bonus credit, which the dialog states before you pay. The invoice always shows only the amount actually paid; the gifted credit appears as a separate entry in the list. Running promotions with impressions, clicks and costs are listed in the Promotion tab — pause, resume or delete at any time.
Topping up requires verification: without a verified organization profile you cannot top up credit — there would be no public groups and therefore nothing to spend the credit on. If a verification expires, the existing credit is kept and running promotions continue; only topping up is no longer possible.
Privacy-friendly: Only your events are promoted — there is no public directory of member profiles.
Profile administration
The profile administration (Administration in the profile tab) is the control center of the organization profile — with four tabs in this order:
IBAN and Stripe for fee payments (chapter 9) — visible to administrators only.
These tabs exist for organisation profiles only. A personal profile shows just the "Management" area in its administration — promotion and balance are club matters.
Several administrators
Via Add user you authorize additional accounts. Important: you enter that person's login email address there — no new profile is created.
The person signs in themselves first. They open app2dat on their device and register with an email, Google or Apple account. Their login email is shown top right in their user menu — that is exactly the address you need. Only an already registered account can be assigned; if the address is unknown, adding fails.
Enter the email. The person is always created as a manager first — straight to administrator is not possible.
Promote if needed: choose "Switch to admin" in the list and confirm with your security PIN. Demoting ("Switch to manager") and removing ("Remove assignment") work the same way.
Restart the app once. The person closes app2dat completely and opens it again — your organisation then appears for them to choose.
Administrator (A) has full access including user management, merging, deleting and payment accounts; manager (M) administers with limited rights and cannot appoint further administrators. The last administrator cannot be removed. The board runs the club together — without a shared password.
Merging profiles
If two personal profiles of the same person were created by mistake, open the redundant one and choose Merge profiles there — the target is the profile to keep. Memberships and attendance are preserved losslessly; the log documents the process. (Merging applies only to personal profiles, not the organization profile.)
Automation & AI
Nobody has to do recurring administrative work by hand. app2dat brings a fully-fledged toolbox for this: your own scripts, a documented API and AI helpers that write the code for you. Automations exist on four levels — user, profile, group and event folder — each with its own magic-wand menu and its own manager access.
Its own manual: This chapter gives the overview — the Automation Manual is a textbook that leads from your first script through the complete a2d API reference to large practical examples and working with the AI assistant.
Automation Manager
Via the Automation Manager — for admins and managers, on all four levels — you open a fully-fledged code editor with tree view and folders. Scripts are plain JavaScript; the editor supports you with syntax highlighting, auto-completion for the entire a2d API and a version history per script. Every run produces an execution report with log, result and error messages — so you see exactly what a script did. The magic-wand icon next to it, by contrast, only runs already-created scripts. Triggers:
Menu trigger — the script appears as an action in the group menu,
Event trigger — runs automatically on data changes (e.g. new attendance, status change), under the user who triggered the change,
AI trigger — the support assistant may offer and run the script on request.
The a2d scripting API
Scripts access your club data through the global a2d object. The complete reference with all methods and parameters is built right into the editor (auto-completion) — and the automation assistant knows it anyway. An overview:
Area
What you can do with it
member, memberData
Read and write members and your own data fields — including specifically for the members currently selected in the list.
group, event, profile
Find, create and maintain groups, event groups and profiles.
session, attendance
Manage sessions, record and evaluate attendance.
chat, topic, notification
Send chat messages (including private ones), topics and push notifications.
document, pdf
Store documents and produce finished PDFs — from certificates to attendance lists, positioned precisely.
export, import
CSV export and import, QR code labels, file downloads.
ui
Dialogs inside the script: input fields, selection lists, confirmations, messages.
vars, date, automation
Store values permanently, convert date formats, call sub-scripts with parameters.
Typical automations from practice: producing a PDF certificate per member, transferring gradings to the main group, importing members from CSV, totalling attendance across several groups, reminders for open fees, bulk notifications.
Automation assistant (AI coding agent)
You don't need to know JavaScript: the built-in automation assistant is an app2dat expert that writes the scripts for you. Describe in plain language what should happen — it looks at your profiles and groups and develops exactly the automation that fits your club. It extends or changes existing scripts just as well. Before handing over the result it checks it for errors and explains the flow; for open decisions it would rather ask than guess. Nothing is executed automatically — you start every script yourself and stay in control. Every script has its own conversation history, so you can pick up at any time (“also add …”). In the editor, the AI Copilot additionally helps with suggestions on the open script — changes appear as a proposal and are only applied when saved.
Security & permissions
Scripts run server-side in a secured sandbox — separate from the base software, which remains untouched and keeps running stably for everyone. And they can never do more than the user who runs them: every a2d method checks the permission (reading from member level, writing from manager or admin level). A faulty script can therefore neither see other people's data nor damage the app.
Support assistant for your members
The AI Assistant also answers administration questions in context and highlights the matching buttons right in the app. Existing automations with an AI trigger are offered as a one-click solution — matched via the script’s name and description, not its code. You maintain the description from the script’s context menu via Edit description; how to word it is explained in the Automation Manual.
For associations: Automations can be shared across groups via references and rolled out to all member clubs via templates — maintained centrally, up to date everywhere.